Monthly Archives: August 2013

Interactive Graph of Historical Web Hosting Ratings

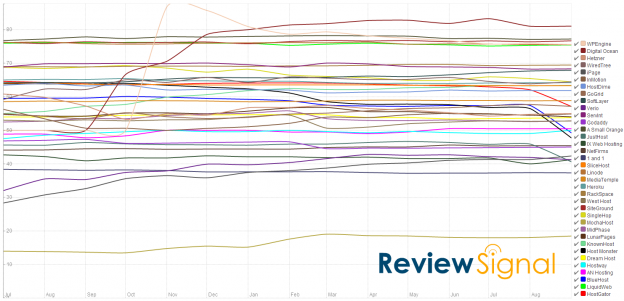
Since Review Signal has launched we've been tracking the opinions of consumers towards some of the largest web hosting providers. Some people frequently ask how often is our data updated? Every day. How often do the rankings change? Not very often. It generally takes time or catastrophic events to shift people's opinions. I can only describe it as a mental inertia or branding. But brands do change, they evolve over time and information spreads. Today you get a chance to look into our data for yourself.

Click Here to Explore Our Interactive Historical Web Hosting Ratings

Happy Staturday!

Keeping Domain Names Separate From Web Hosting

Domain names and web hosting seem to go together like peanut butter and jelly. You buy a domain name and connect it to your web hosting. It seems natural to have the two together. But I generally advocate against keeping your domain name registered with your web hosting company.

The main reason I advocate for keeping your domain name(s) separate from web hosting is because things are far more likely to go wrong with your web hosting before your domain name. Domain registrars are at least partially regulated, by ICANN. There is only one documented major registrar failure, RegisterFly, and stricter oversight has been put in place because of it. Domain registrars aren't perfect, but for the most part they serve one purpose: managing a domain name for a small fee. The majority of them are adequate at this function. Registrars have also standardized the process of transferring domain names between registrars. So switching registrars isn't terribly complicated (get transfer code, provide to new registrar, accept transfer). The registrar also has no influence on your domain name*.

Web hosts have full control of what your website can do. Almost all of them have restrictions in their terms of service (especially shared hosting) which limit what you can and can't do. If they have your domain name too, you can't simply change web hosts in the event of a problem or dispute. Your domain can be held hostage or as a bargaining chip to make sure you renew or pay them.

There is potentially a secondary problem with a web host registering a domain name for you. The ownership of the domain name comes into question. Do they register it in your name making you the legal owner or their company's name, making them the de facto owner.

The common arguments in favor of keeping your domain name with your web host are simplicity and cost. I can't argue against the simplicity argument. If having two accounts with different companies is too difficult for some reason, there is no counter argument. The cost argument shouldn't come into play when a domain name is around $10/year. It's a fairly low cost item relative to the amount of pain it can cause if something goes wrong.

In conclusion, unless you have some exceptional circumstance preventing you from keeping your domain separate from your web hosting, the two simply don't belong together at one company.

* Some registrars do have policies restricting the type of name, the content put on the domain and the activities a domain can be used for. These generally include spamming and illegal materials.

Reverse Proxy and Cache Server with Nginx

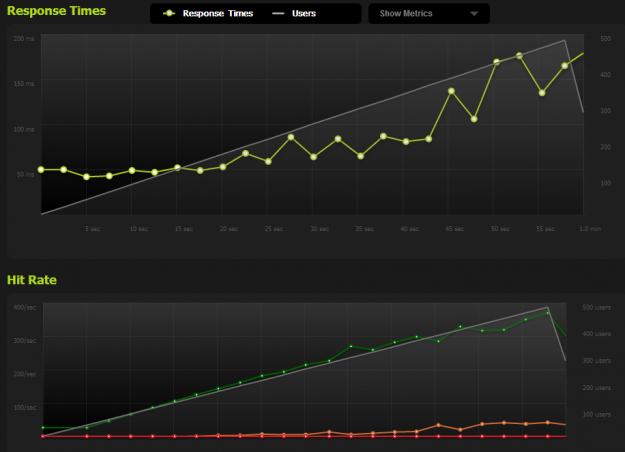
This is one of the ways I improve performance here at Review Signal. I run an nginx reverse proxy and cache system in front of the apache server. Apache can be slow and doesn't have a built in caching system for a lot of the static content we serve. So I put Nginx in front to cache and serve all the content it can directly from memory. This improves the performance of my servers and users get their content faster. It also can help when there is a high load. If you want to see how it performs, I've included a screenshot from Blitz.io at the bottom showing how well Review Signal performs with 500 concurrent users.

The Nginx config (http, server):

http {
  proxy_redirect off;
  proxy_set_header Host $host;
  proxy_set_header X-Real-IP $remote_addr;
  proxy_set_header X-Forwarded-For $proxy_add_x_forwarded_for;
 
  # caching options
  proxy_cache_path /var/cache/nginx levels=1:2 keys_zone=my-cache:8m 
max_size=1000m inactive=600m;
  proxy_temp_path /var/cache/tmp;
 
server {
  listen 80;
  server_name subdomain.example.com;
  access_log on;
  error_log on;
 
  location /{
    proxy_pass http://localhost:3000/subdomain;
  }
}
 
server {
  listen 80;
  server_name example.com;
  access_log on;
  error_log on;
 
  location / { 
    proxy_pass http://localhost:3000/; 
    proxy_cache my-cache;
    proxy_cache_valid 200 302 60m;
    proxy_cache_valid 404 1m;
  }
 }
}

Please note that only the relevant parts to this article are included (http and server). You definitely need to add more options to the config before http and in your http section. I didn't include those parts because they can vary a huge amount. See the Nginx documentation  for more details and example configurations.

Configuration Walkthrough:

  proxy_redirect off;
  proxy_set_header Host $host;
  proxy_set_header X-Real-IP $remote_addr;
  proxy_set_header X-Forwarded-For $proxy_add_x_forwarded_for;

proxy_redirect off tells the server we aren't redirecting content. We actually do that later with proxy_pass. The headers we set allow you to see proper header information on the server you are proxying to. Without X-Real-IP/X-Forwarded-For the server will simply see your reverse proxy server's IP address.

  proxy_cache_path /var/cache/nginx levels=1:2 keys_zone=my-cache:8m 
max_size=1000m inactive=600m;
  proxy_temp_path /var/cache/tmp;

The first line tells nginx where to save cache data (path), the structure of the cache data (levels), names your cache and it's size (keys_zone), max cache size (max_size) and how long before cached data is expired (inactive). The second line tells nginx where to save temporary data which it uses in building the cache.

server {
  listen 80;
  server_name subdomain.example.com;
  access_log on;
  error_log on;
 
  location /{
    proxy_pass http://localhost:3000/subdomain;
  }
}

This server code creates a reverse proxy to localhost:3000. It doesn't do any caching, it simply forwards all requests between Nginx and the localhost:3000. It is listening to subdomain.example.com and any request to it (/) are passed to localhost:3000/subdomain.

server {
  listen 80;
  server_name example.com;
  access_log on;
  error_log on;
 
  location / { 
    proxy_pass http://localhost:3000/; 
    proxy_cache my-cache;
    proxy_cache_valid 200 302 60m;
    proxy_cache_valid 404 1m;
  }
 }

This server is a reverse proxy and cache. We're responding to any request to example.com. It's forwarding all requests to localhost:3000. It also is creates a cache called my-cache (notice this matches the proxy_cache_path keys_zone setting). proxy_cache_valid defines what HTTP codes can be cached and for how long. So in this example 200 (OK) and 302 (FOUND) are cached for 60 minutes. 404 (NOT FOUND) is cached for 1 minute.

Conclusion

Setting up a reverse proxy isn't too difficult. However, it can be complicated to get it working with your application on occasion. You can empty the cache manually by deleting all the contents in the cache folder. That often helps fix issues. Nginx is fairly smart and when you pass post data, it doesn't serve cached pages, but get/head data will be cached by default. This setup works great when you serve a lot of static content. I run it in front of almost everything here at Review Signal including our blog. It's easy enough to configure different caching levels for different parts of your application. And if you're ever in doubt, test the application directly, then just reverse proxy without caching, and then turn on caching.

As promised, here is what Review Signal's performance looks like when rushing with Blitz.io from 1-500 concurrent users with this nginx setup. It responds to around 300 concurrent requests without going over 100ms response time.

nginxblitzio

I Am Free To Do Whatever I Want! Will Your WordPress Host Agree With That?

Guest Post from Lilyana Yakimova, Marketing Director of SiteGround | SiteGround Reviews

When it comes to freedom, WordPress users seem really blessed. Not only they can extend their website almost infinitely with the help of thousands of WordPress themes and plugins, but they are also free to choose among more hosting options than anyone else. The range is really wide: starting from the free service at wordpress.com, going through all the standard shared web hosts*, which are perfectly compatible with WordPress, and ending with a number of managed hosts** that are highly specialized in WordPress only. There are many articles comparing the prices, the speed, or the reliability of the WordPress hosts, but what is seldom talked about is how the different hosting options compare in terms of website management freedom they give to the user.

What affects the level of freedom allowed by a WordPress host?

The easy, but not completely correct answer is that account management freedom depends on the price. Of course it is only natural that if you use a completely free service like wordpress.com, you will be limited in some ways. You will not be able to install all themes and plugins you want, or you will not be able to use your own domain, or you will not be able to call someone 24/7 to report a problem.

However, when it comes to paid hosting solutions the correlation between the price and the freedom is not so straightforward. Quite often you can do more things on a standard and cheaper host, than on a more expensive managed host. For example, you can easily get access to MySQL, 24/7 phone support, additional hosting services like email, SSH etc. on a general host, while at strictly managed WordPress hosts some or all of these features are missing. In addition, most standard hosts do not place any limitations on which WordPress versions you may host or what plugins you can add, while managed hosts often force the newest WordPress version on all of their users websites and completely ban certain plugins.

So why is there such a discrepancy? Managed WordPress hosts would probably argue that the real price of the freedom is the level of your website security. They will claim that if they are to take full responsibility for your website security, you should sacrifice some of your freedom in return. On the other hand, the standard shared hosts will leave most of the responsibility in your own hands and when something goes bad, it will be blamed on your decision to use a vulnerable plugin or your failure to upgrade your application.

So what do you choose - freedom or security? And can’t you have both?

It seems that it all comes down to the good old question: how much freedom you are willing to sacrifice in the name of security? Well I believe that in the WordPress hosting world there is a reasonable middle ground.

Let’s take, for example, the auto-upgrades. The WordPress managed host will normally upgrade compulsory all their users, whenever a new WordPress version is released. Most standard shared hosts, on the other hand, would do nothing and their customers may never realize that an important security update is released and that an upgrade is now due. A good middle ground host can do better. It can still be proactive, by providing automatic upgrade to its customers and informing them about each new version released, and, at the same time, it can be more democratic by allowing its users a way out of the auto upgrades. Thus people that would like to take over the upgrade process themselves can easily do so.

Another interesting security case is when vulnerability appears in a plugin used by the host customers. The easiest way to protect efficiently all your users, applied by WordPress managed hosts, is to simply disable all instances of the plugin installed. However, thus a functionality chosen by your users will be taken away from their websites. The contrary approach is to let the users add any plugin and deny, as a host, to take any responsibility for their choices. A good middle ground host will again look for a different way around. It will work on a solution that will fix the vulnerability on a server level. Thus it will take care of the security without punishing the user for a flaw in a plugin code, for which the user was most probably not even aware of. Of course this scenario is efficient when the host is always on top of the security and is able to provide a patch for the vulnerability almost immediately after it has been disclosed.

So to conclude: you probably can never be totally free and totally safe at the same time. However, when it comes to your WordPress hosting, I believe that you should not be forced to sacrifice too much from either your freedom or security, as in most of the situations there is a reasonable middle ground.

------

*Examples of standard shared hosts companies: HostGator, BlueHost, DreamHost, etc.

**Examples of popular managed WordPress hosts: WPEngine, ZippyKid, Page.ly

How to Backup/Export Your MySql Database(s)

I will teach you two ways to backup/export your mysql database(s). The first option is using phpMyAdmin; phpMyAdmin is generally installed on most shared hosting and is bundled with cPanel. The second method is SSH; this requires SSH access (often found on VPS/Dedicated servers).

Backing Up Your Database With phpMyAdmin

  1.  Login to your phpMyAdmin. If you are using cPanel, it has its own icon on the dashboard when you login.
  2.  Click on the database you want to backup/export.
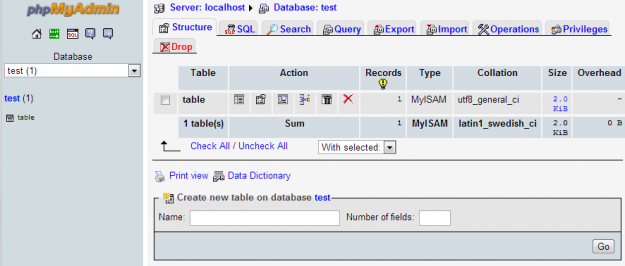
  3.  You should see a screen like this:phpmyadmin
  4. Click on the Export tab at the top.

The default options are generally good. It will save both your schema (database design) and data (database content). However, if the database is large, you probably want to choose 'Save as a File' and pick a compression type (zip/gzip). This will let you download the file and have it take less space. If it's small and you just want the code directly, don't change this.

If you want to import the data, just click the import tab (instead of export) and upload the file.

Backing Up Your Database With SSH

We are going to use mysqldump which comes with mysql.

  1.  Login to your server via SSH.
  2. Type in the following command replacing YOURUSER, YOURPASSWORD and YOURDATABASE with your mysql username, mysql password and the database you want to backup. Also change /path/to/output/file.sql to the location you want to save the backup.
mysqldump –quick –user=YOURUSERNAME –password=YOURPASSWORD YOURDATABASE < /path/to/output/file.sql

If you want to backup all your databases instead of a specific database, replace YOURDATABASE with –all-databases

Once the command finishes running, your backup is in the .sql file you specified.

If you want to automate backups of your database, there is a nifty MySql backup to Amazon's S3 file storage script here: https://github.com/woxxy/MySQL-backup-to-Amazon-S3

Understanding Unlimited Web Hosting

We have all seen the advertisement. Unlimited Web Hosting. For a few dollars a month you get everything. It sounds great, right?

What are Unlimited Hosting Plans Really Offering?

Unlimited disk space and unlimited bandwidth are the two things generally covered by unlimited plans. You sometimes see other things such as email accounts, mysql databases, and more; but that's not very important for this article because they are dependent on disk space.

Does this sound too good to be true?

There is no such thing as an unlimited size disk drive and no network connection with unlimited speed (and therefore bandwidth). There are physical constraints, hard drives are a certain size and network connections only go so fast. So in a sense, it is too good to be true. Most of these companies are overselling their services. That means they know how many resources an average customer uses and puts as many customers as they can on a single server to minimize costs. The reality is that most customers use very few resources. For the customers that do use a lot of resources, they hide limits in the terms of service.

Common Limits Hidden in Terms of Service:

  •  iNode limitations – This is the number of files you can have on your server. Unlimited disk space, but limited number of files.
  •  CPU limitations – Hosts generally say you can't use more than your fair share of the CPU. If your site gets a substantial amount of traffic, it is likely that the CPU usage will be dramatically higher too and they will pull the plug or ask you to pay more.
  •  Memory limitations – This is similar to CPU limitations, when you get a lot of visitors, your website will generally increase memory (RAM) usage.
  •  Content Restrictions – Hosts often disallow file hosting, backups and many other types of content. File hosting is a pretty ambiguous term because everything on the server is a file.
  •  Suspend you for any reason – This is a catch-all for unprofitable customers. Using too much of their resources? Goodbye.

Are All Unlimited Hosts Bad Then?

No. They vary like any other type of company. Some are better than others. If you plan on using a lot of resources though, you will probably be kicked off or asked to upgrade, generally to a VPS which dedicates resources specifically to your website.

Just be aware unlimited does have limitations, but they are really designed to keep the users who would use unlimited resources out. Most customers don't fit that profile. But once you've decided you're not really going to need unlimited resources, it's worth comparing web hosts on other dimensions.

Graph of Web Hosting Ratings at Review Signal Since Launch

Happy Staturday!

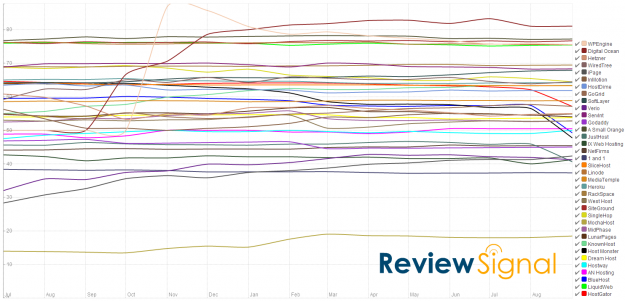
I didn't quite finish porting the D3 / Rickshaw version of this to WordPress, so that users can explore the data themselves. So that will probably be next Staturday. However, I wanted to share a preview visualizing how the rankings at Review Signal have changed over time.

A few interesting points are this month, August 2013, you can see the four major EIG brands we track drop (BlueHost, HostGator, HostMonster, JustHost). We see WPEngine come down to mortal levels. We see the rise of DigitalOcean. I will do a more thorough investigation when the interactive chart gets published.


[Click Graph to Enlarge]

web_hosts_overall_rating_monthly_changes

Meet The Host: SiteGround

This is the first post in our Meet The Host series. The idea is to let consumers see both the human side as well as the hardware side of the web hosting businesses through pictures.

Meet SiteGround (Website | Reviews)

SiteGround was founded in 2004. Today, it has 100 employees and over 250,000 domain names hosted. SiteGround also has three data centers in Chicago, Amsterdam and Singapore where their customers websites are hosted.

Quote from the Host:

What really makes the difference is our unique team and company culture. I am extremely proud to be part of a team that I can openly call a family - coming to the office doesn’t feel like coming to work, but coming to see friends with which we do fantastic things together.  Everyone is extremely helpful, knowledgeable and highly professional. Besides enjoying our great office, we also spend time together at company supported vacations, teambuilding and office parties.

- Tina Kesova, SiteGround

Photo Gallery:

The SiteGround office features open space, modern and relaxing atmosphere with more than 50 square feet of space per employee to foster creativity.

The SiteGround office features open space, modern and relaxing atmosphere with more than 50 square feet of space per employee to foster creativity.

This is where the technical masterminds live - the corner that hosts SiteGround software operations and senior support engineers.

This is where the technical masterminds live - the corner that hosts SiteGround software operations and senior support engineers.


The software developers work closely with the customer service teams to implement client feature requests.

The software developers work closely with the customer service teams to implement client feature requests.

SiteGround crew are real beer lovers too. A rare beer collection decorates the devs corner.

SiteGround crew are real beer lovers too. A rare beer collection decorates the devs corner.


The SiteGround HQ has 7 conference rooms to host meetings, trainings or day-to-day brainstorming sessions and welcome company partners and guests.

The SiteGround HQ has 7 conference rooms to host meetings, trainings or day-to-day brainstorming sessions and welcome company partners and guests.

Half of the SiteGround office is a big recreation area where SG folks play different kinds of games to relax and build even further the great team spirit that makes SiteGround what it really is – one of the friendliest hosting companies!

Half of the SiteGround office is a big recreation area where SG folks play different kinds of games to relax and build even further the great team spirit that makes SiteGround what it really is – one of the friendliest hosting companies!

The game and recreation area allows people to play foosball, table tennis, darts, pool table, and more.

The game and recreation area allows people to play foosball, table tennis, darts, pool table, and more.


SiteGround invests in the education and professional growth of their employees and provides free books and a library area where SG team members can sit down and read in a quiet area.

SiteGround invests in the education and professional growth of their employees and provides free books and a library area where SG team members can sit down and read in a quiet area.


The SiteGround team knows how to party and never misses a chance to get together and celebrate big company milestones. Then, the office becomes a party corner that can even host casino games.

The SiteGround team knows how to party and never misses a chance to get together and celebrate big company milestones. Then, the office becomes a party corner that can even host casino games.


Each year the company organizes a teambuilding where all employees get together in informal surroundings to build further the team spirit.

Each year the company organizes a teambuilding where all employees get together in informal surroundings to build further the team spirit.


Working hard, partying hard! Besides building reliable hosting platforms and climbing high peaks at teambuildings, the SiteGround people know how to have fun together.

Working hard, partying hard! Besides building reliable hosting platforms and climbing high peaks at teambuildings, the SiteGround people know how to have fun together.

Amsterdam Data Center - A power distribution unit (PDU) and a standard row of cabinets, full of SiteGround servers.

Amsterdam Data Center - A power distribution unit (PDU) and a standard row of cabinets, full of SiteGround servers.

Chicago Data Center - The Chicago datacenter is organized into computer rooms like this, each one being about 30,000 square feet in size. The SiteGround servers reside in rooms like this one.

Chicago Data Center - The Chicago datacenter is organized into computer rooms like this, each one being about 30,000 square feet in size. The SiteGround servers reside in rooms like this one.

Singapore Data Center - The Singapore layouts are designed to allow the most dense population on the row possible, while ensuring rack power availability allows for full failover.

Singapore Data Center - The Singapore layouts are designed to allow the most dense population on the row possible, while ensuring rack power availability allows for full failover.

Singapore Data Center - Redundant APC power strips provide power to SiteGround dual-path servers.

Singapore Data Center - Redundant APC power strips provide power to SiteGround dual-path servers.

A large thank you goes to Tina at SiteGround who helped collect and caption the photos for this post. I hope you enjoyed our first edition of our Meet The Host series.

Long Running Processes in PHP

Here at Review Signal, I use a lot of PHP code and one of the challenges is getting PHP to run for long periods of time.

Here are two sample problems that I deal with at Review Signal that require PHP processes to run for long periods of time or indefinitely:

  1. Data processing – Every night Review Signal crunches millions of pieces of data to update our rankings.
  2. Twitter Streaming API data – this requires a constant connection to the Twitter API to receive messages as they are posted on Twitter

The Tools

One of the best things as of PHP 5 is CLI (Command Line Interface). PHP CLI allows you to run things directly from the command line and doesn't have a time limit built in. All the pains of set_time_limit() and playing with php.ini disappear.

If you're going to be working from the command line, you're probably going to need to learn a little bit of bash scripting.

Finally, we will use cron (crontab / cron jobs)

SSH vs Cron Jobs

I need to explain that when you run something from a ssh session it is different from when you setup a cronjob to run something for you. An SSH session can be a good place to test scripts and run one-time processes. While a cronjob is the right way to setup a script you want run regularly.

If I write this line into my SSH session

php myscript.php

It will execute myscript.php. However, my terminal will be locked up until it completes.

You can get around this by holding ctrl+z (pauses the execution) and then type 'bg' (backgrounds the process).

For longer running processes, this can be nice, but if you lose your SSH session, it will terminate execution.

You can get around this by using the nohup (no hangup) command.

nohup php myscript.php

nohup allows execution to continue even if you lose the session. So if you use nohup, and then background the process it will finish executing regardless of your SSH session's status.
All of this only matters if you are running things manually from the command line. If you are running scripts with some regularity and using cronjobs, then you do not need to worry about these issues. Since the server itself is executing them, the SSH terminal sessions don't matter.

Update: A few readers reminded me that you can add an ampersand (&) to the end a command to background it immediately. This avoids having to ctrl+z, bg.

nohup php myscript.php &

Sometimes, you make a mistake and run a process without nohup but want it to continue running even if your SSH session disconnects. I've run scripts late at night thinking they would be quick, only to find out they took a lot longer than expected and I had to go home. This trick allows you to run the script as a daemon, so it won't terminate upon SSH session ending.

  1. ctrl+z to stop (pause) the program and get back to the shell
  2. bg to run it in the background
  3. disown -h [job-spec] where [job-spec] is the job number (like %1 for the first running job; find about your number with the jobs command) so that the job isn't killed when the terminal closes

Credit to user Node on StackOverflow

Data Processing with PHP

Since I run this script regularly, I create a bash script which is executed by a cron job.

Example bash script which actually runs the PHP script:

#!/bin/sh
php /path/to/script.php

Example cron job:

0 0 23 * * /bin/sh /path/to/bashscript.sh

If you don't know where to put the code above, type 'crontab -e' to edit your cron table and save it. The 0 0 23 * * tells it run when the time is 0 seconds, 0 minutes, 23 hours on any day, any day of the week.

So now we have a basic script which will run every night at 11pm. It doesn't matter how long it will take to execute, it will simply start every night at that time and run until it's finished.

Twitter Streaming API

The second problem is more interesting because the PHP script needs to be running to collect data. I want it running all the time. So I have a php script (thank you to Phirehose library) which keeps an open connection to the Twitter API but I can't rely on it to always be running. The server may restart, the script may error out, or other problems could occur.

So my solution has been to create a bash script to make sure the process is running. And if it isn't running, run it.

#!/bin/sh
 
ps aux | grep '[m]yScript.php'
if [ $? -ne 0 ]
then
    php /path/to/myScript.php
fi

Line by line explanation:

#!/bin/sh

So we start with our path to the shell.

ps aux | grep '[m]yScript.php'

process list is piped (|) to grep which searches for '[m]yScript.php'. I use the [m] regular expression matching so it doesn't match itself. Grep will spawn a process with myScript.php in the command, so it will always find a result if you search without putting something in brackets.

if [ $? -ne 0]

This checks the last command's return value. So if nothing was returned by searching our process list for [m]yScript.php

then
    php /path/to/myScript.php
fi

These lines are executed if our php script isn't found running. It runs our php script. The conditional is then terminated with fi.

Now, we create a cron job that executes the script above:

* * * * * /bin/sh runsForever.sh

So now we have a system that checks every minute to see if myScript.php is running. If it isn't running, it starts it.

Conclusion

You will notice the Twitter streaming script is just a more advanced version of the data processing. Both of the working versions have a lot more things going on in my live scripts but are beyond the scope of this article. If you are interested in extending them, you may want to look into logging as a first step. What I've learned from years of hands-on practice is that this setup can and does work. I've run php processes for many months on this configuration.
WordPress + Nginx + Uploads = 413 Request Entity Too Large

Happy WordPress Wednesday! The day of the week dedicated to talking about WordPress.

Or sad, if you had to deal with the problem I ran into today while working on our WordPress blog. I wanted to upload some larger pictures and got a cryptic 'HTTP Error'.

Let me explain the architecture I am running here so that this makes sense. I run Nginx as a reverse proxy and caching server in front of Apache. Nginx forwards traffic to apache when it needs to and serves everything from memory when it doesn't (which is incredibly fast).

Back onto the problem, the error message isn't helpful. I did what I normally do, look at the error log. I didn't see anything in the apache log or the nginx log.

What I did discover was by opening Chrome's developer tools and watching the Network tab I could see the file uploads were failing. They were red and had a status code of 413: Request Entity too Large.

Now I know my httpd.conf (Apache's config file) was set to accept files as big as these images.

So now I had to look at the nginx.conf. What I discovered was nginx's default setting is 1 megabyte. So I added this line to my http configuration within nginx:

client_max_body_size 20m;

According to the documentation you can put it in http, server, and location.

A quick

service nginx restart

And all was well in the world.

Loading...

Interested in seeing which web hosting companies people love (and hate!)? Click here and find out how your web host stacks up.